
Welcome to Part 1 of this tutorial series on building a RESTful API using Node.js and Express! In this post, we’ll cover everything you need to get your API up and running from scratch. We’ll start by setting up your development environment, installing necessary tools, creating a basic Express server, and diving into essential middleware. Then, we’ll explore how to handle different types of HTTP requests with routing — including dynamic route parameters and query strings.
In this guide, you’ll learn how to build a production-ready REST API from scratch using Node.js and Express. By the end, you’ll have a fully functional API that:
✔️ Handles CRUD operations (Create, Read, Update, Delete)
✔️ Uses middleware for request processing
✔️ Supports dynamic routing with parameters
✔️ Returns professional JSON responses
What to Expect
- Today (Part 1): Server setup, middleware, routing fundamentals
- Part 2 (Coming Next): Error handling, project organization, and Postman testing
Ready to dive in? Let’s get started!
1- Why Build a REST API?
What is a REST API?
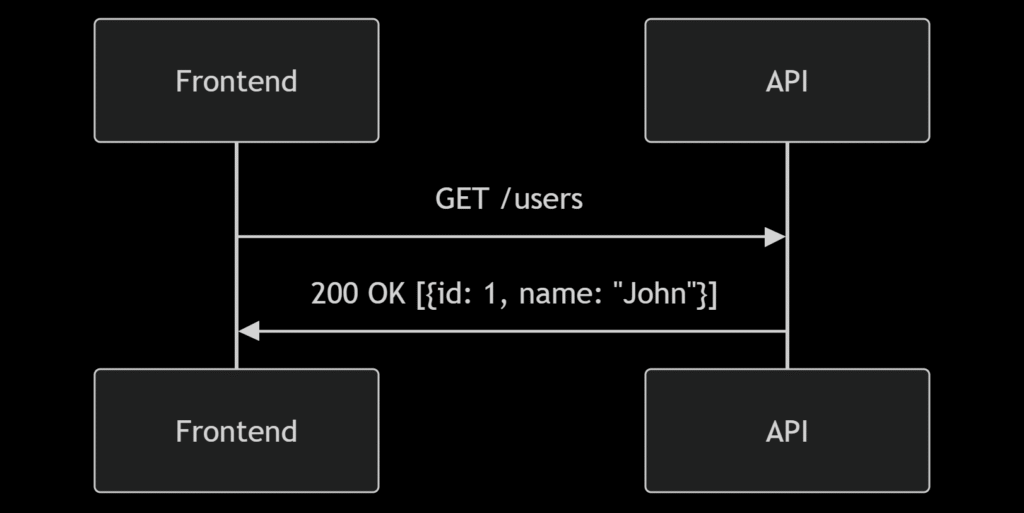
A REST API (Representational State Transfer) is a way for your backend server to expose data and functionality to clients — like frontend apps, mobile apps, or other servers — using standard HTTP methods like GET, POST, PUT, and DELETE.
It returns data (often in JSON format) based on the structure of URLs and HTTP verbs, allowing client-side applications to interact with your backend in a predictable and stateless way.
Why it’s Important in Modern Web Development
In today’s architecture, frontend and backend are typically separated. React, Vue, or Angular apps rely on REST APIs to fetch and update data dynamically. This makes APIs a core skill for modern developers.
Whether you’re building a social media app, an e-commerce store, or a simple to-do list, the backend API is what enables storing, retrieving, and managing real data.
2-Setting Up the Development Environment
Quick Environment Check
Before writing any code, you need to set up your development environment properly. This ensures your Node.js API runs smoothly on your local machine.
Node.js is a JavaScript runtime that allows you to run JavaScript outside the browser. npm (Node Package Manager) helps you install and manage libraries like Express.
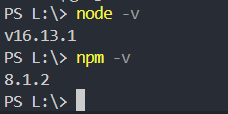
Verify installation by running in your terminal/command prompt:
node -v
npm -vYou should see version numbers for both commands, confirming they are ready to use.
Initializing a Node Project
Create a new folder for your project and open a terminal there. Initialize a new Node.js project with:
npm init -yThis creates a package.json file with default settings to manage your project’s metadata and dependencies.
Installing Express
Express is a minimal and flexible Node.js web framework that simplifies building web applications and APIs.
Install Express by running:
npm install expressAfter npm install express
The node_modules folder appears, and package.json lists Express under dependencies.
Project Folder Structure
Here’s a simple folder structure to start with:
/my-api
  |-- /node_modules
  |-- package.json
|-- index.jsWe’ll keep it simple for now, with index.js as the main server file. Later, we’ll add folders to organize routes, controllers, and more.
3- Creating an Express Server
Now that your environment is set up, let’s create a simple Express server. For now, we’re working with a single main server file called index.js. As the project grows, we’ll organize the code into folders like routes, controllers, and more.
Here’s the basic Express app setup inside index.js:
// Import the Express library
const express = require('express');
// Create an Express application instance
const app = express();
// Define the port to listen on (use environment variable or default to 3000)
const PORT = process.env.PORT || 3000;
// Define a route handler for GET requests to the root URL ('/')
// When someone visits '/', send back a simple message
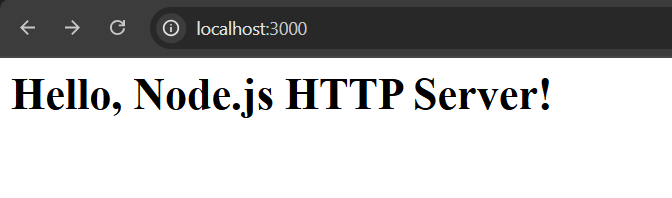
app.get('/', (req, res) => {
res.send('<h1>Hello, Node.js HTTP Server!</h1>');
});
// `req` is the request object, representing the HTTP request
// `res` is the response object, used to send a response back to the client
// Start the server and have it listen on the specified port
// When the server starts, log a message to the console
app.listen(PORT, () => {
console.log(`Server is running on port ${PORT}`);
});When you build a web server using Express, app.listen() is the command that tells your server to start running and listen for incoming requests on a specific port.
Think of it like this:
- Your computer is a big building.
- A port is like a specific door in that building.
- When you use
app.listen(PORT), you’re telling your server,
“Hey, start waiting by this door (port) and listen for anyone who wants to come in and talk to you.”
Running the Server
node index.jsThen open your browser and visit http://localhost:3000 — you should see:
When you run your server using the basic command: node index.js you’ll need to manually stop and restart the server every time you make changes to your code. This can become tedious during development. here comes the need to use the nodemon tool.
Using Nodemon for Auto-Reload
When running the server using the basic command above, you’ll need to manually stop and restart the server every time you make code changes. To avoid this, use nodemon, which watches your files and reloads the server automatically.
To automatically restart your server when you change your code, you can use nodemon without installing it globally by running:
npx nodemon index.jsThis runs nodemon on demand without a permanent install.This way, nodemon watches your files and reloads the server automatically, making development faster and smoother.
Alternatively, if you want to install nodemon as a dev dependency and configure it for your project, you can follow the official instructions here: Nodemon Documentation.
4- Middleware Essentials: Understanding Middleware and Using express.json()
What is Middleware?
Middleware in Express is a function that processes incoming requests before they reach route handlers or before responses are sent. It has access to the request (req) and response (res) objects, and a next() function to pass control to the next middleware in the chain.
How Middleware Works
When a request hits your server, it passes through middleware functions in the order they were added using app.use() or on specific routes. Each middleware can either handle the request and end the response or call next() to pass control to the next middleware.
Types of Middleware We will be Using
In the example below, we use three types of middleware:
- Built-in Middleware
express.json()is a built-in Express middleware that parses incoming JSON request bodies and makes them available underreq.body.
- Custom Middleware
- We write a simple logging middleware that logs the HTTP method and URL for every incoming request. This middleware function is custom-made for our server.
- Third-party Middleware
- In later posts, you’ll see third-party middleware like
corsto enable Cross-Origin Resource Sharing, andmorganfor advanced logging.
- In later posts, you’ll see third-party middleware like
Middleware Flow in Express
Requests flow through middleware functions sequentially in the order they are registered. Each middleware decides whether to handle the request or pass it on.
Here’s a simple diagram illustrating the flow in our server:

⚠️ Don’t Forget next()! Forgetting to call next() in non-terminating middleware will freeze requests.
Applying Middleware to Our Server
Let’s see how we apply this in our index.js file:
const express = require('express');
const app = express();
const PORT = 3000;

// Built-in middleware: parses incoming JSON requests
app.use(express.json());

// Custom middleware: logs method and URL
app.use((req, res, next) => {
  console.log(`${req.method} ${req.protocol}://${req.get("host")}${req.originalUrl}`);
  next(); // Pass control to the next middleware or route handler
});

// Example route handler
app.get('/', (req, res) => {
  res.send('Hello from Express!');
});

// Start the server
app.listen(PORT, () => {
  console.log(`Server running on http://localhost:${PORT}`);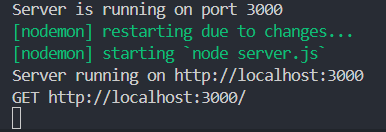
});The image below shows Nodemon automatically detecting code changes and restarting the server, streamlining development by eliminating the need for manual restarts.
Understanding Routes as Middleware
It’s important to understand that all routes in Express are technically middleware functions. They receive the same arguments — req, res, and next — as custom middleware. However, in most route handlers, you won’t see next() being called because routes usually end the request-response cycle by sending a response to the client.
On the other hand, custom middleware functions often use next() to tell Express to move on to the next middleware or route handler. We’ll explore more about how and when to use next() in future posts as we dive deeper into routing and error handling.
Order Matters: Middleware executes sequentially. For example,
express.json()must come before routes that need parsed JSON bodies. Similarly, error handlers (covered in Part 2) must go after all routes.”
5- Routing: GET, POST, PUT, DELETE
Now that we have our server set up with essential middleware to parse JSON and log requests, it’s time to talk about how we actually handle different kinds of requests from clients. This is where routing comes in — routing is how your server decides what to do when it receives a request on a certain URL with a specific HTTP method.
Think of your server as a restaurant kitchen. The middleware we added earlier acts like the prep staff: it gets the ingredients ready (parsing JSON, logging requests), cleans up, and passes everything along. Routing is like the chef who reads the order ticket and decides what dish to prepare.
Understanding HTTP Methods
HTTP methods are the types of “orders” your server can receive. The most common ones you’ll use in REST APIs are:
- GET: Asking for information, like “show me the menu” or “what users do you have?”
- POST: Sending new information, like “add this new user to the system.”
- PUT: Changing existing information, like “update this user’s details.”
- DELETE: Removing information, like “remove this user from the system.”
How to Define Routes in Express
In Express, you define routes by specifying the HTTP method and the URL path. For example:
app.get('/users', (req, res) => {
  res.send('Get all users');
});This means: When a GET request is made to /users, run this function and send back a response.
Defining Multiple Routes and Testing in Browser
Before we look at all HTTP methods together, let’s try adding a few simple routes to our server so you can see how different URLs respond differently.
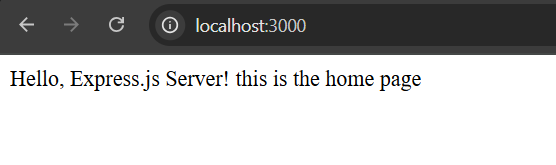
app.get('/', (req, res) => {
res.send('Hello, Express.js Server! this is the home page');
});
app.get('/about', (req, res) => {
res.send('This is the about page');
});
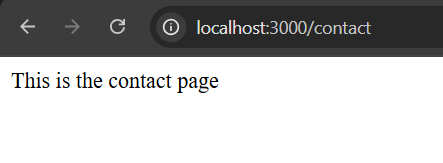
app.get('/contact', (req, res) => {
res.send('This is the contact page');
});Save and run your server, then open your browser and visit:
- http://localhost:3000/ — Shows: Hello, Express.js Server! this is the home page
- http://localhost:3000/about — Shows: This is the about page

- http://localhost:3000/contact — Shows: This is the contact page
This is a great way to start seeing how Express handles routing.
Bringing It All Together: GET, POST, PUT, DELETE
Now that you understand the basics, here are all four main HTTP methods working together:
// Get all users
app.get('/users', (req, res) => {
  res.send('Get all users');
});
// Create a new user
app.post('/users', (req, res) => {
res.send('Create a new user');
});
// Update a user by ID
app.put('/users/:id', (req, res) => {
res.send(`Update user with id ${req.params.id}`);
});
// Delete a user by ID
app.delete('/users/:id', (req, res) => {
res.send(`Delete user with id ${req.params.id}`);
});Notice how these route handlers work hand-in-hand with the middleware you set up earlier. For example, express.json() parses the JSON body of a POST or PUT request so you can access data inside req.body. Meanwhile, your logging middleware tracks each incoming request, making it easier to debug and monitor what’s happening.
You’ll notice that some routes, like PUT and DELETE, include a
:idin the path — this is called a route parameter. Don’t worry if that looks unfamiliar right now — we’ll break it down in the next section.
Testing POST, DELETE, and PUT Routes
Now that we’ve defined all CRUD routes (GET, POST, PUT, and DELETE), it’s time to test them to make sure they work as expected. You can test GET requests easily by typing the URL in your browser, as we did earlier. For POST, PUT, and DELETE requests, you’ll need a tool like Postman or Insomnia. Don’t worry — we’ll cover how to use Postman effectively in part 2 of this series
6- Route Parameters and Query Strings
So far, we’ve seen how to handle basic routes like /users or /about. But what if you want to get or modify a specific item, like a user with ID 123 or filter products by category? That’s where route parameters and query strings come in.
What Are Route Parameters?
Route parameters are dynamic parts of a route that act as placeholders. They allow you to capture values directly from the URL path.
For example, if you want to fetch a user by their ID, you can define a route like this:
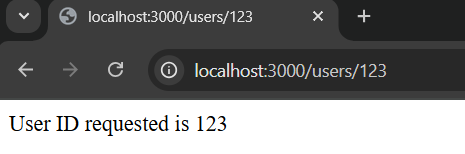
app.get('/users/:id', (req, res) => {
  const userId = req.params.id;
  res.send(`User ID requested is ${userId}`);
});Here, the :id is a route parameter. If you visit http://localhost:3000/users/123, the server responds with User ID requested is 123.
What Are Query Strings?
Query strings are another way to send data through URLs, often used for filtering, sorting, or pagination.They come after the question mark ? in a URL and consist of key-value pairs separated by &.
In Express, you can access query parameters via req.query:
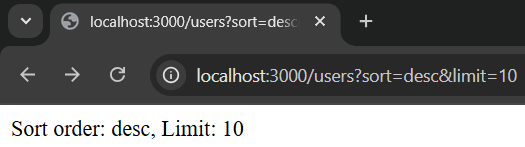
app.get('/users', (req, res) => {
  const sort = req.query.sort;
  const limit = req.query.limit;
  res.send(`Sort order: ${sort}, Limit: ${limit}`);
});If you visit http://localhost:3000/users?sort=desc&limit=10, the output will be:
Accessing Route Params and Query Strings Together
Sometimes, you may need to use both route parameters and query strings:
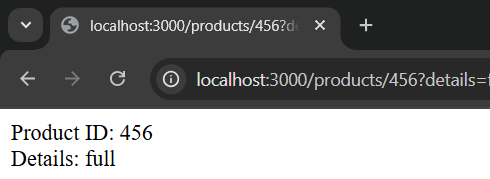
app.get('/products/:id', (req, res) => {
  res.send(`
    Product ID: ${req.params.id}<br>
    Details: ${req.query.details || 'basic'}
  `);
});If you visit http://localhost:3000/products/456?details=full
You will have the following output
It’s important to understand that route parameters are typically required parts of the URL — the server expects them to be present in order to identify a specific resource, like a user ID or product ID. On the other hand, query strings are optional and often provide additional instructions or filters for the request. For example, query strings are commonly used for pagination (?page=2&limit=10), filtering (?category=shoes&color=red), or sorting results, allowing clients to customize the data they receive without changing the core URL structure.
7. Returning JSON Responses and Status Codes
Now that you know how to set up routes and handle incoming requests, it’s time to talk about how to send meaningful responses back to the client. A good API doesn’t just send back plain text — it communicates clearly using structured JSON and proper HTTP status codes.
Why JSON?
JSON (JavaScript Object Notation) is the standard format for sending and receiving data in web APIs. It’s readable, easy to parse, and works seamlessly with JavaScript — making it the ideal choice for both frontend and backend communication.
While Express’s res.send() method can send various types of responses such as strings, HTML, or JSON, using res.json() explicitly sends a JSON response and automatically sets the Content-Type header to application/json. This ensures the client correctly interprets the response as JSON. Now that we’ve used res.send(), let’s upgrade to structured responses.
Instead of just sending a string like:
res.send('User created');You can send a structured JSON object:
res.json({ message: 'User created successfully' });You can also combine this with an HTTP status code to provide more context about the result:
res.status(201).json({ message: 'User created successfully' });This tells the client not only what happened (message) but also how it went (201 Created).
How JSON Responses Appear in Browsers
Modern browsers automatically format JSON responses to make them easy to read. For instance:
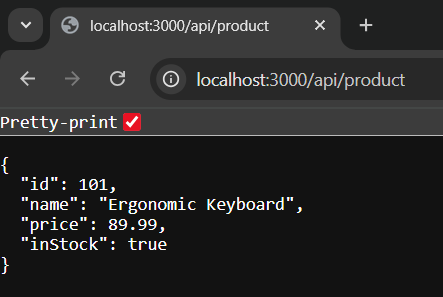
app.get('/api/product', (req, res) => {
  res.json({
    id: 101,
    name: "Ergonomic Keyboard",
    price: 89.99,
    inStock: true
  });
});if you visit http://localhost:3000/api/product, in your browser will display a nicely formatted JSON object:
Common HTTP Status Codes
Here are some of the most commonly used status codes in REST APIs:
| Code | Meaning | When to Use It |
|---|---|---|
| 200 | OK | Standard successful GET or general request |
| 201 | Created | When a resource is successfully created (e.g., POST) |
| 400 | Bad Request | When the request is malformed or missing data |
| 404 | Not Found | When the requested resource doesn’t exist |
| 500 | Internal Server Error | When something unexpected goes wrong on the server |
These status codes help API consumers and developers understand the state of the request, and are crucial for proper error handling and debugging.
Example: Sending JSON with Status Codes
Let’s improve our route handlers by sending structured JSON responses with appropriate status codes:
// Get all users
app.get('/users', (req, res) => {
  res.status(200).json({ users: ['User1', 'User2', 'User3'] });
});

// Create a new user
app.post('/users', (req, res) => {
  const userData = req.body;
  if (!userData.name) {
    return res.status(400).json({ error: 'Name is required' });
  }
  res.status(201).json({ message: 'User created', user: userData });
});In the POST example above:
- If the
namefield is missing from the request body, we return a 400 Bad Request with an error message. - If everything looks good, we respond with 201 Created and send back the new user’s data.
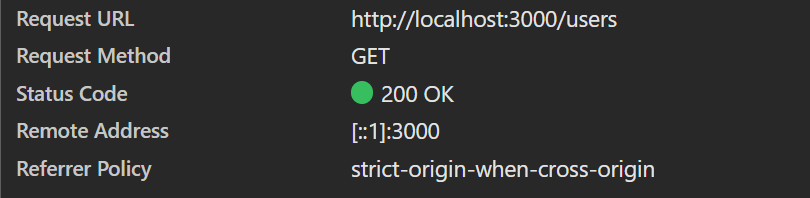
In the GET request example, if you visit http://localhost:3000/users, you will receive a JSON array of users with an HTTP status code of 200 OK.

To verify the response and status code, open your browser’s Developer Tools, go to the Network tab, and inspect the request to /users. You’ll see the JSON response along with the HTTP status code 200 OK.
What’s Next?
Congrats! You now have a fully functional Express server that handles various routes, utilizes different types of middleware, understands how to work with route parameters and query strings, and responds with clear, structured JSON data alongside meaningful HTTP status codes.
In Part 2, we’ll build on this foundation by adding robust error handling, organizing your project structure for scalability, and thoroughly testing your API using Postman. Finally, we’ll prepare your app to connect with a real database in future tutorials.
If you’re ready to take your API to the next level, continue to Part 2 here.